Honda NX500 Fluid Capacities: Oil, Coolant, Fuel and Brake Fluid
The Honda NX500 is a 471cc adventure-touring motorcycle. It features a “daily crossover” concept, making it comfortable for both everyday use and long-distance journeys. This comprehensive technical guide details the official fluid capacities, factory-recommended specifications, and step-by-step maintenance procedures directly from the manufacturer’s service guidelines.
Quick Technical Specifications Overview
Below is the complete breakdown of all fluid capacities and specifications specific to the Honda NX500:
| Fluid Type | Condition / Service Interval | Capacity / Spec |
| Fuel Tank Capacity | Full Tank Capacity | 4.62 US gal (17.5 L) |
| Low Fuel Indicator Reserve (1st/E segment flashing) | 0.74 US gal (2.8 L) | |
| Fuel Type / Octane Requirement | Unleaded Gasoline, PON 86 or higher | |
| Engine Oil Capacity | After Draining (Oil Change Only) | 2.5 US qt (2.4 L) |
| After Draining & Oil Filter Replacement | 2.7 US qt (2.6 L) | |
| After Engine Disassembly | 3.3 US qt (3.1 L) | |
| Recommended Oil Grade / Viscosity | SAE 10W-30, API SJ or higher | |
| JASO Standard | JASO T 903 Standard MA | |
| Cooling System | Total System Capacity | 1.39 US qt (1.32 L) |
| Recommended Coolant Type | Pro Honda HP Coolant | |
| Brake Fluid | Hydraulic System Requirement | Honda DOT 4 Brake Fluid |
Step-by-Step Maintenance Procedures
A. Engine Oil Inspection and Refill Procedure
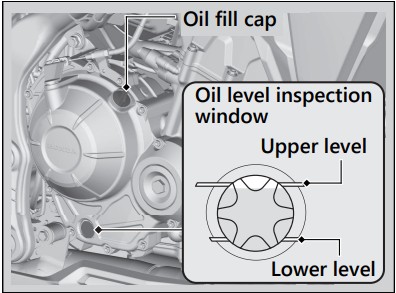
Inspecting Engine Oil Level
-
Warm Up the Engine: If the engine is cold, start it and let it idle on a level surface for 3 to 5 minutes.
-
Rest Period: Turn the ignition switch to OFF and wait 2 to 3 minutes to allow the oil to settle back into the oil pan.
-
Position the Vehicle: Hold the motorcycle in a fully upright position on a firm, level surface.
-
Inspect the Sight Glass: Locate the oil level inspection window on the right side of the crankcase. Verify that the oil level sits between the Upper Level and Lower Level indicator marks.
Adding Engine Oil
-
Remove Cap: Clean any dirt around the filler opening and remove the oil fill cap.
-
Top Up Oil: Slowly add the recommended SAE 10W-30 JASO MA engine oil until the fluid level reaches the upper level mark on the inspection window.
-
Precaution: Keep the bike perfectly upright while adding oil. Do not overfill above the upper line, as this can lead to oil aeration and engine seal damage. Ensure no debris or foreign objects fall into the open filler neck. Wipe away any accidental spills immediately.
-
-
Secure Cap: Reinstall the oil fill cap securely.
B. Cooling System Inspection and Refill Procedure
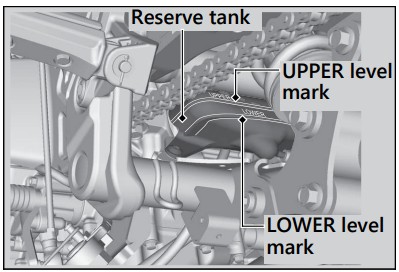
Checking Coolant Level
-
Engine Temperature Check: Perform inspection only when the engine is completely cold.
-
Vehicle Alignment: Place the motorcycle upright on a firm, level surface.
-
Inspect Reserve Tank: Locate the coolant reserve tank and verify that the coolant level lies between the UPPER level and LOWER level marks.
-
Note: If the reserve tank is empty or drops rapidly, inspect the cooling system for leaks or consult a qualified dealer immediately.
-
Adding Coolant
-
Open Reserve Cap: Remove the reserve tank cap to top up the fluid.
-
WARNING: Never remove the radiator cap while the engine is hot. Scalding coolant or steam under high pressure can cause severe personal injury. Add coolant exclusively through the reserve tank.
-
-
Fill to Upper Mark: Add Pro Honda HP Coolant (or an equivalent pre-mixed 50/50 ethylene glycol coolant) into the reserve tank until the level reaches the UPPER level mark. Avoid overfilling.
-
Reinstall Cap: Firmly tighten the reserve tank cap.
C. Hydraulic Brake Fluid Inspection Procedure
Front Brake Fluid Level
-
Position the motorcycle upright on a firm, level surface.
-
Ensure the front handlebar is aligned so the front master cylinder reservoir is horizontal.
-
Check the fluid level window; ensure the brake fluid remains strictly above the LOWER level mark.
Rear Brake Fluid Level
-
Stand the motorcycle upright on a level surface.
-
Inspect the translucent rear reservoir located behind the right frame cover.
-
Ensure the fluid level is maintained between the LOWER level and UPPER level marks.
-
Service Tip: If the brake fluid level drops below the LOWER level mark on either reservoir, inspect the front and rear brake pads for wear before topping up fluid. Low fluid levels often indicate worn pad friction material.
-
D. Refueling and Fuel Cap Operation
-
Opening the Fuel Cap:
-
Open the keyhole lock cover on the fuel tank cap.
-
Insert the ignition key into the lock cylinder and turn it clockwise.
-
Lift open the hinged fuel fill cap.
-
-
Refueling Guidelines:
-
Use unleaded gasoline with a minimum Pump Octane Number (PON) of 86 or higher.
-
Do not overfill above the bottom edge of the internal level plate in the fuel filler neck. Overfilling leaves no space for fuel expansion and can overflow or clog the evaporative emissions canister.
-
-
Closing the Fuel Cap:
-
Push the fuel fill cap down firmly into place until the latch clicks and locks automatically.
-
Remove the ignition key and snap the protective lock cover shut. (The key cannot be withdrawn unless the fuel cap is fully locked in position)
-